Equipment and procedures

An atomic force microscope (AFM) probes a surface with a very fine tip. The coordinates recorded in this way make it possible to obtain a three-dimensional image of a surface. On technical objects sub-nanometre resolutions can be obtained. The two METAS metrology AFMs have built in interferometers for the traceability of all axes.
Calibration services include 1D and 2D pitch, step height, linewidth, roughness according to existing standards (PDF, 62 kB, 06.07.2020), stylus tip radii and edge sharpness as well as the diameter calibration of reference nanospheres made from polymers or gold colloids.
• METinfo 1999 (Das Metrologie-Rasterkraftmikroskop) (PDF, 236 kB, 24.09.2024)
• METinfo2001_2 (Erster CCL-Vergleich im Bereich der Nanometrologie) (PDF, 100 kB, 24.09.2024)
• METinfo2011_2 (New Traceable Atomic Force Microscope for Dimensional Measurements) (PDF, 267 kB, 23.09.2024)

The surface laboratory is concerned with the assessment of roughness, waviness, texture as well as groove depth and other special surface shapes such as contour and edge radius using measured surface profiles.

The photomask measuring system allows to localise and measure structures on glass, such as those used in photolithography. The measurement range is 400 mm x 300 mm.
The positions of structures such as edges, lines, crosses, circles, squares, etc. are detected by a video microscope and evaluated by means of digital image analysis.
- Calibration of Photomasks (PDF, 654 kB, 06.07.2020)
- METinfo 2011.3 (Massstabvergleich bestätigt METAS-Kompetenz) (PDF, 90 kB, 24.09.2024)

Together with each calibration of a 2D photo mask customers obtain additionally to the measured values a data evaluation program on CD which helps to characterise 2D measurement equipments such as projectors, measuring microscopes, optical probing 2D coordinate measuring machines according to ISO 10360.
• METAS mask evaluation tool flyer (pdf) (PDF, 361 kB, 06.07.2020)
• Download METASMaskEval Software (Version 1.4.1, 27 MB) (ZIP, 28 MB, 08.01.2025)

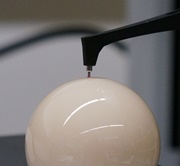
The ultra-precise coordinate measuring machine µ-CMM for micro components is based on two key components: First, on a new probe head with very small probing forces, which we have developed in collaboration with the EPFL and the company MECARTEX, and secondly on an ultra precise translation stage made at Philips CFT in Eindhoven. These main components were characterized in its finest details and complemented with a new controller and a QUINDOS interface. Together with our excellent laboratory conditions a unique coordinate measuring machine with unprecedented precision was obtained.
Working volume: 80 mm x 80 mm x 38 mm
MPE ISO 10360-2: 40 nm + L/4000, L in mm
Last modification 24.09.2024

